
Generally
LoRaWan+NB-IOT+MQTT
With the new firmware 2.3.1(150), LoRaWan, NB-IOT and other external sensors can now also be integrated.
However, the prerequisite is that they hand over their sensor data to an MQTT broker; OpenSprinkler can then subscribe to this as sensor data.
The sensor is integrated with its “topic” and a text/JSON filter. The irrigation controller can then use this value.
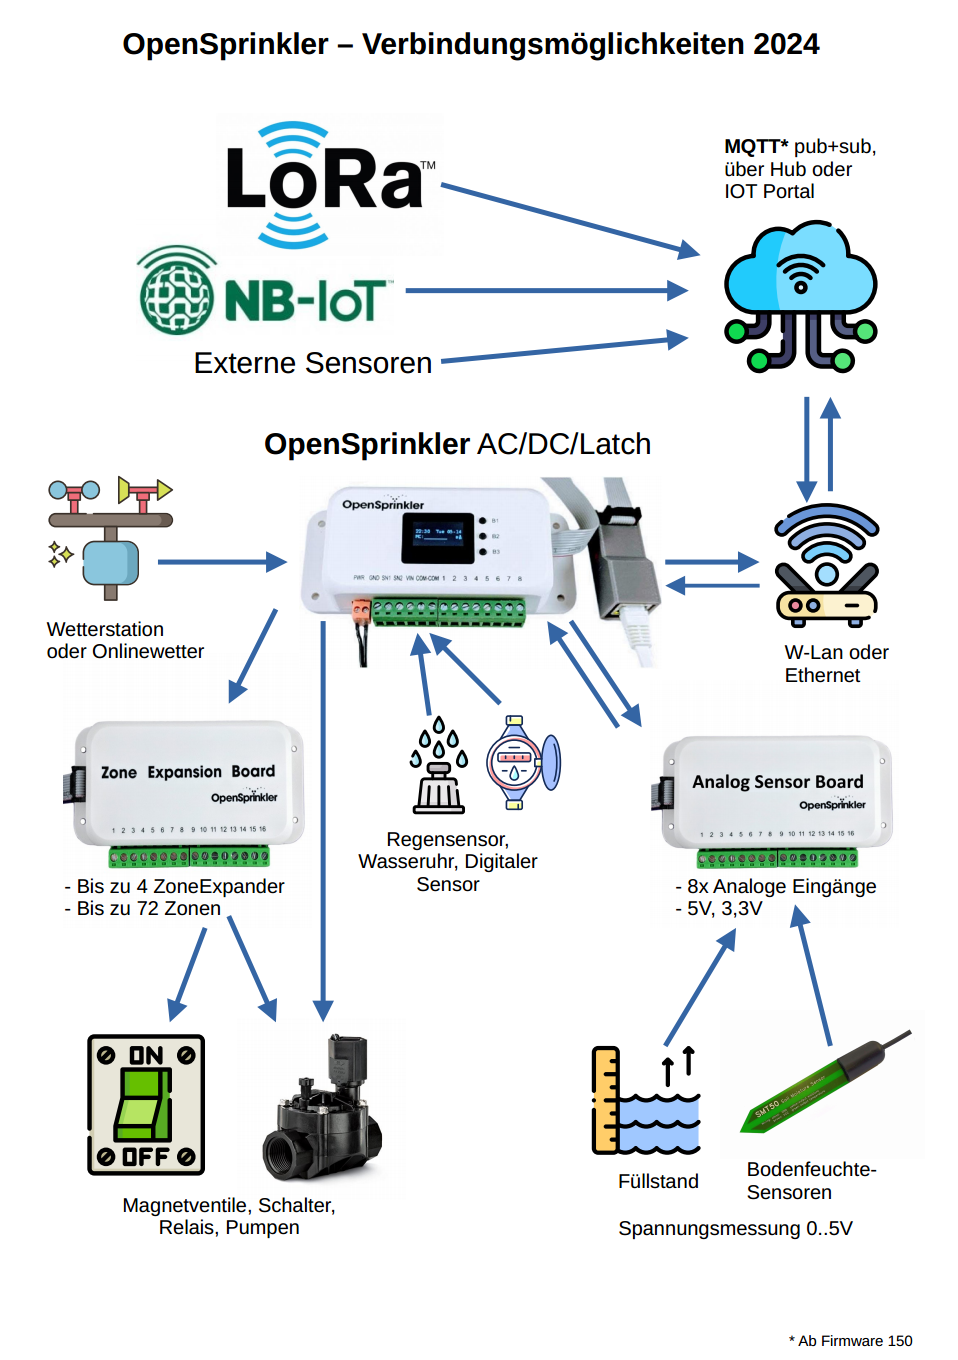
This is how it works:
- LoRa WAN sensors are placed within the radius of a LoRa WAN hub, depending on the version, with a range of up to 10 km. You operate the LoRa WAN hub, also called gateway, yourself and connect it to your network
- NB-IoT sensors are integrated via the provider portal. Since NB-IoT works over the cellular network, the sensor can be located anywhere - provided there is reception.
- In the gateway or provider portal, activate the MQTT function and use it to export the sensor data. Depending on the version, further implementation with an IoT management tool such as ChirpStack may be necessary, which converts the “bare” sensor data into evaluable data.
- In OpenSprinkler you connect it via the MQTT options and then create a new sensor of type “MQTT Subscription”.
- Enter the subscription information and the data filter in the sensor.
- Complete! As soon as data is received, the values are displayed and saved.
Sensor configuration in detail
The two MQTT sensors are marked red. The other sensors are integrated via the analog sensor board

Edit sensor
By clicking on “Add Sensor” or on the name of an existing sensor you get the following editor:
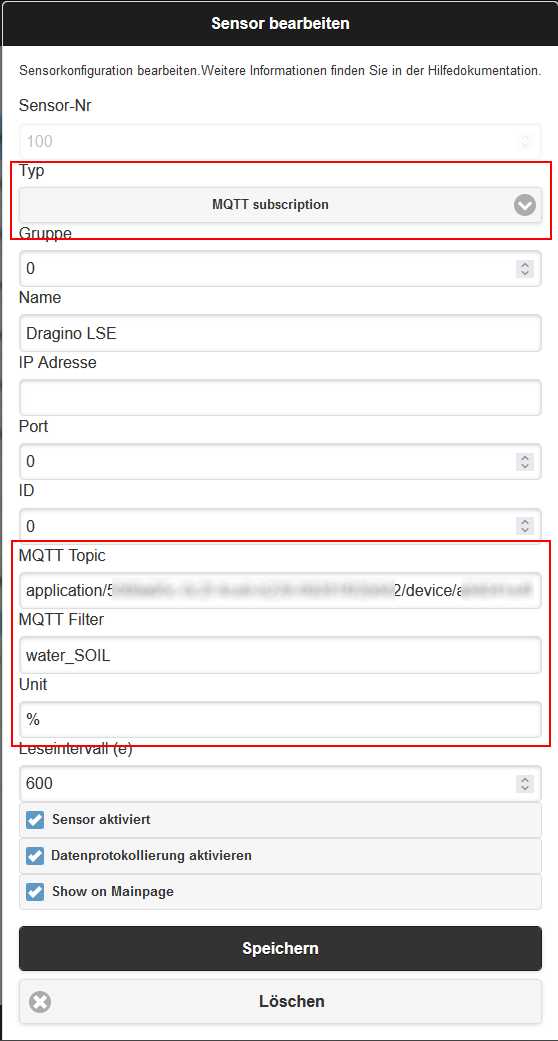
This example shows a CHIRPSTACK integration of MQTT data. The structure is defined as follows:
application/<application-id>/device/<deviceid>/event/up
It's best to look at the possible values using a tool, such as the MQTT Explorer. It is often confusing, especially for beginners, that nothing is displayed in the MQTT Explorer. Because the sensor data only arrives every 10 minutes (depending on the configuration), you simply have to leave the MQTT Explorer for a while.
For the MQTT Filter field, enter the name of the field that is to be read. In CHIRPSTACK you can see the fields read out under “Device Profiles” / “Measurements”. If nothing appears here, you must first save a script in the “CODEC” tab; the templates can help here or you can ask the sensor manufacturer.
Why LoRaWAN or NB-IoT and not Wi-Fi or Bluetooth?
The biggest problem with sensors is that they require power. If you can lay a power cable, then you can usually also lay a data cable. But if this is not possible, how do you connect these sensors?
To answer this question, we made some experiments and present the results here.
- Bluetooth fails, the range is simply too short (unless of course the plants are within 10m. See here)
- WiFi can be used, but the power consumption is so high that you either have to change the batteries every 4 weeks or you need huge batteries. This can also be improved with photovoltaics, but then you already have high investment costs per sensor. In addition, there is a certain risk of property damage when installing outdoors.
- LoRaWAN is more suitable here because the batteries are long-lasting and often last up to 10 years. The outdoor range can be up to 10 km (open field, urban areas approx. 2 km). Since LoRaWAN can be operated license-free, there are only one-off costs.
- NB-IoT is also very suitable if there is appropriate mobile phone coverage. This means the range is virtually “infinite” because the sensor data is delivered to a cloud service. However, there are ongoing costs
Realization and testing
For our test we used a Milesight UG65-868M as a LoRaWAN gateway, as well as a Dragino LSE01 and a Milesight EM-500 SMTC soil moisture sensors. Since the UG65 can also activate an MQTT broker with the latest update (ChirpStack-common must be activated), it can be connected as an independent MQTT server.
Both sensors can measure not only soil moisture, but also soil temperature and dielectric conductivity (permittivity). The last value in particular is very important for the agricultural sector, as it can also be used to determine the fertilizer content of the soil.
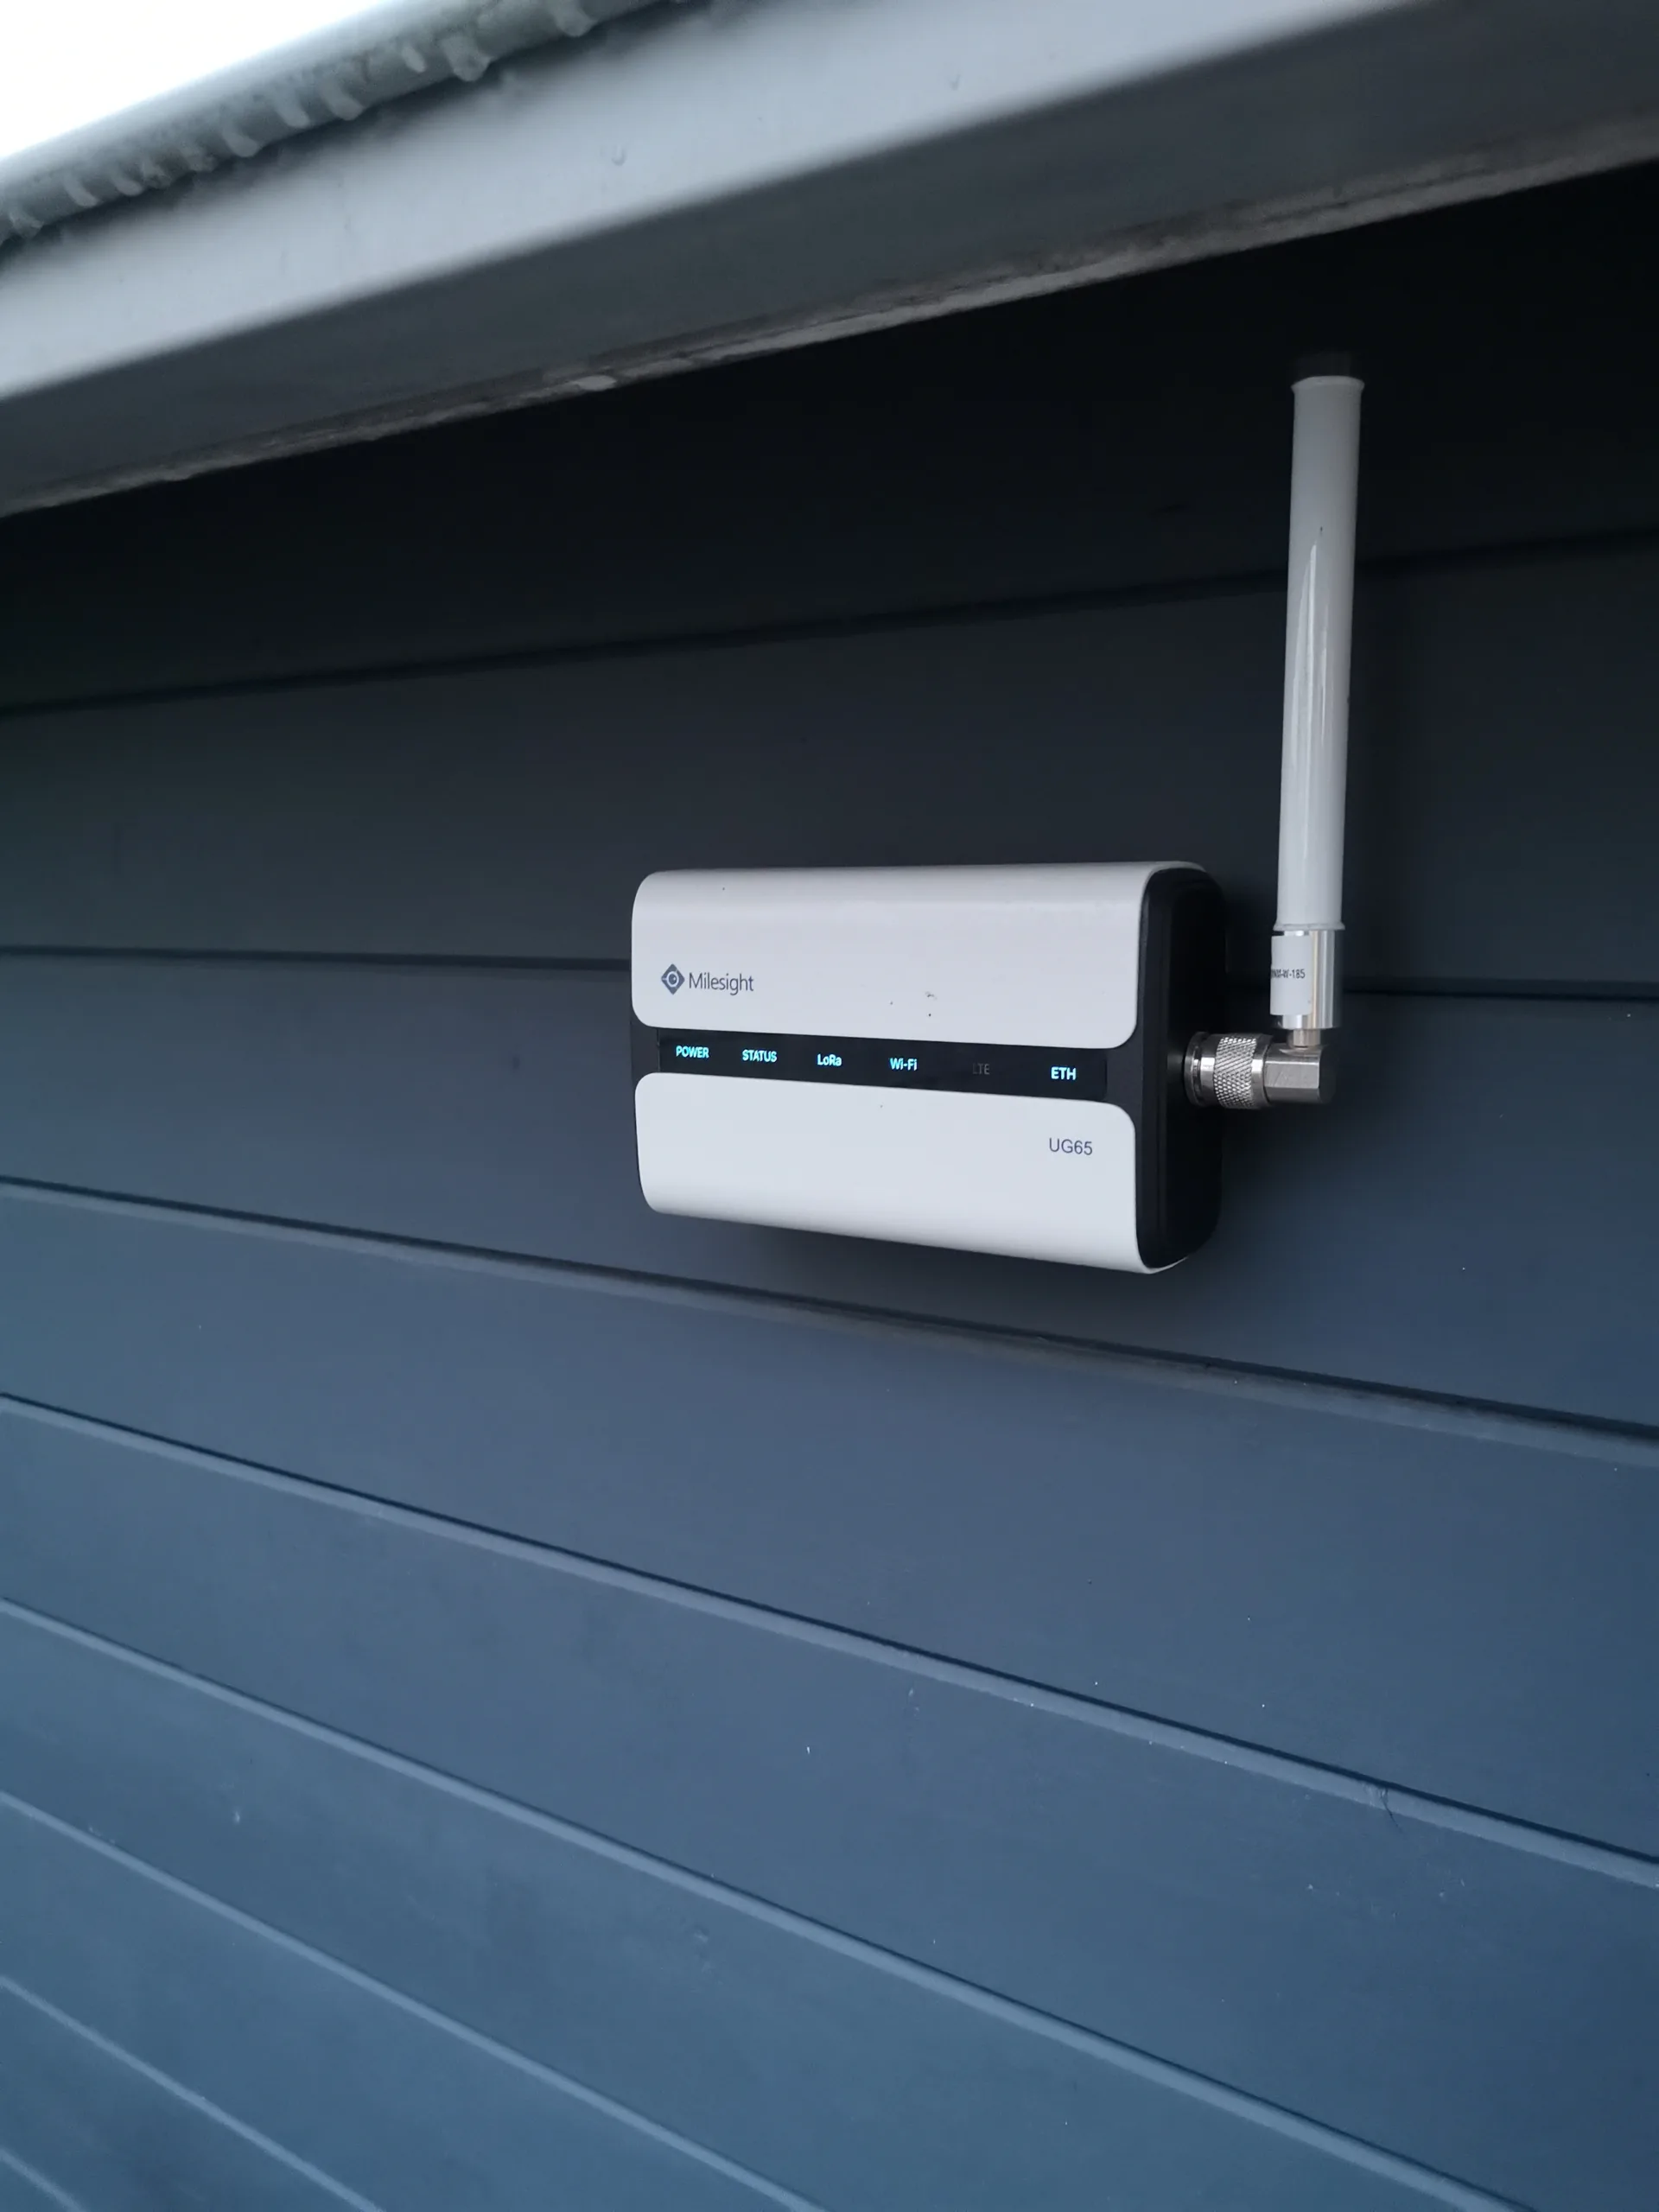
The Milesight UG65 has the power connections at the back and can be operated via POE. It also has WiFi and can even serve as an access point. Other antennas and an LTE module are also available as options.
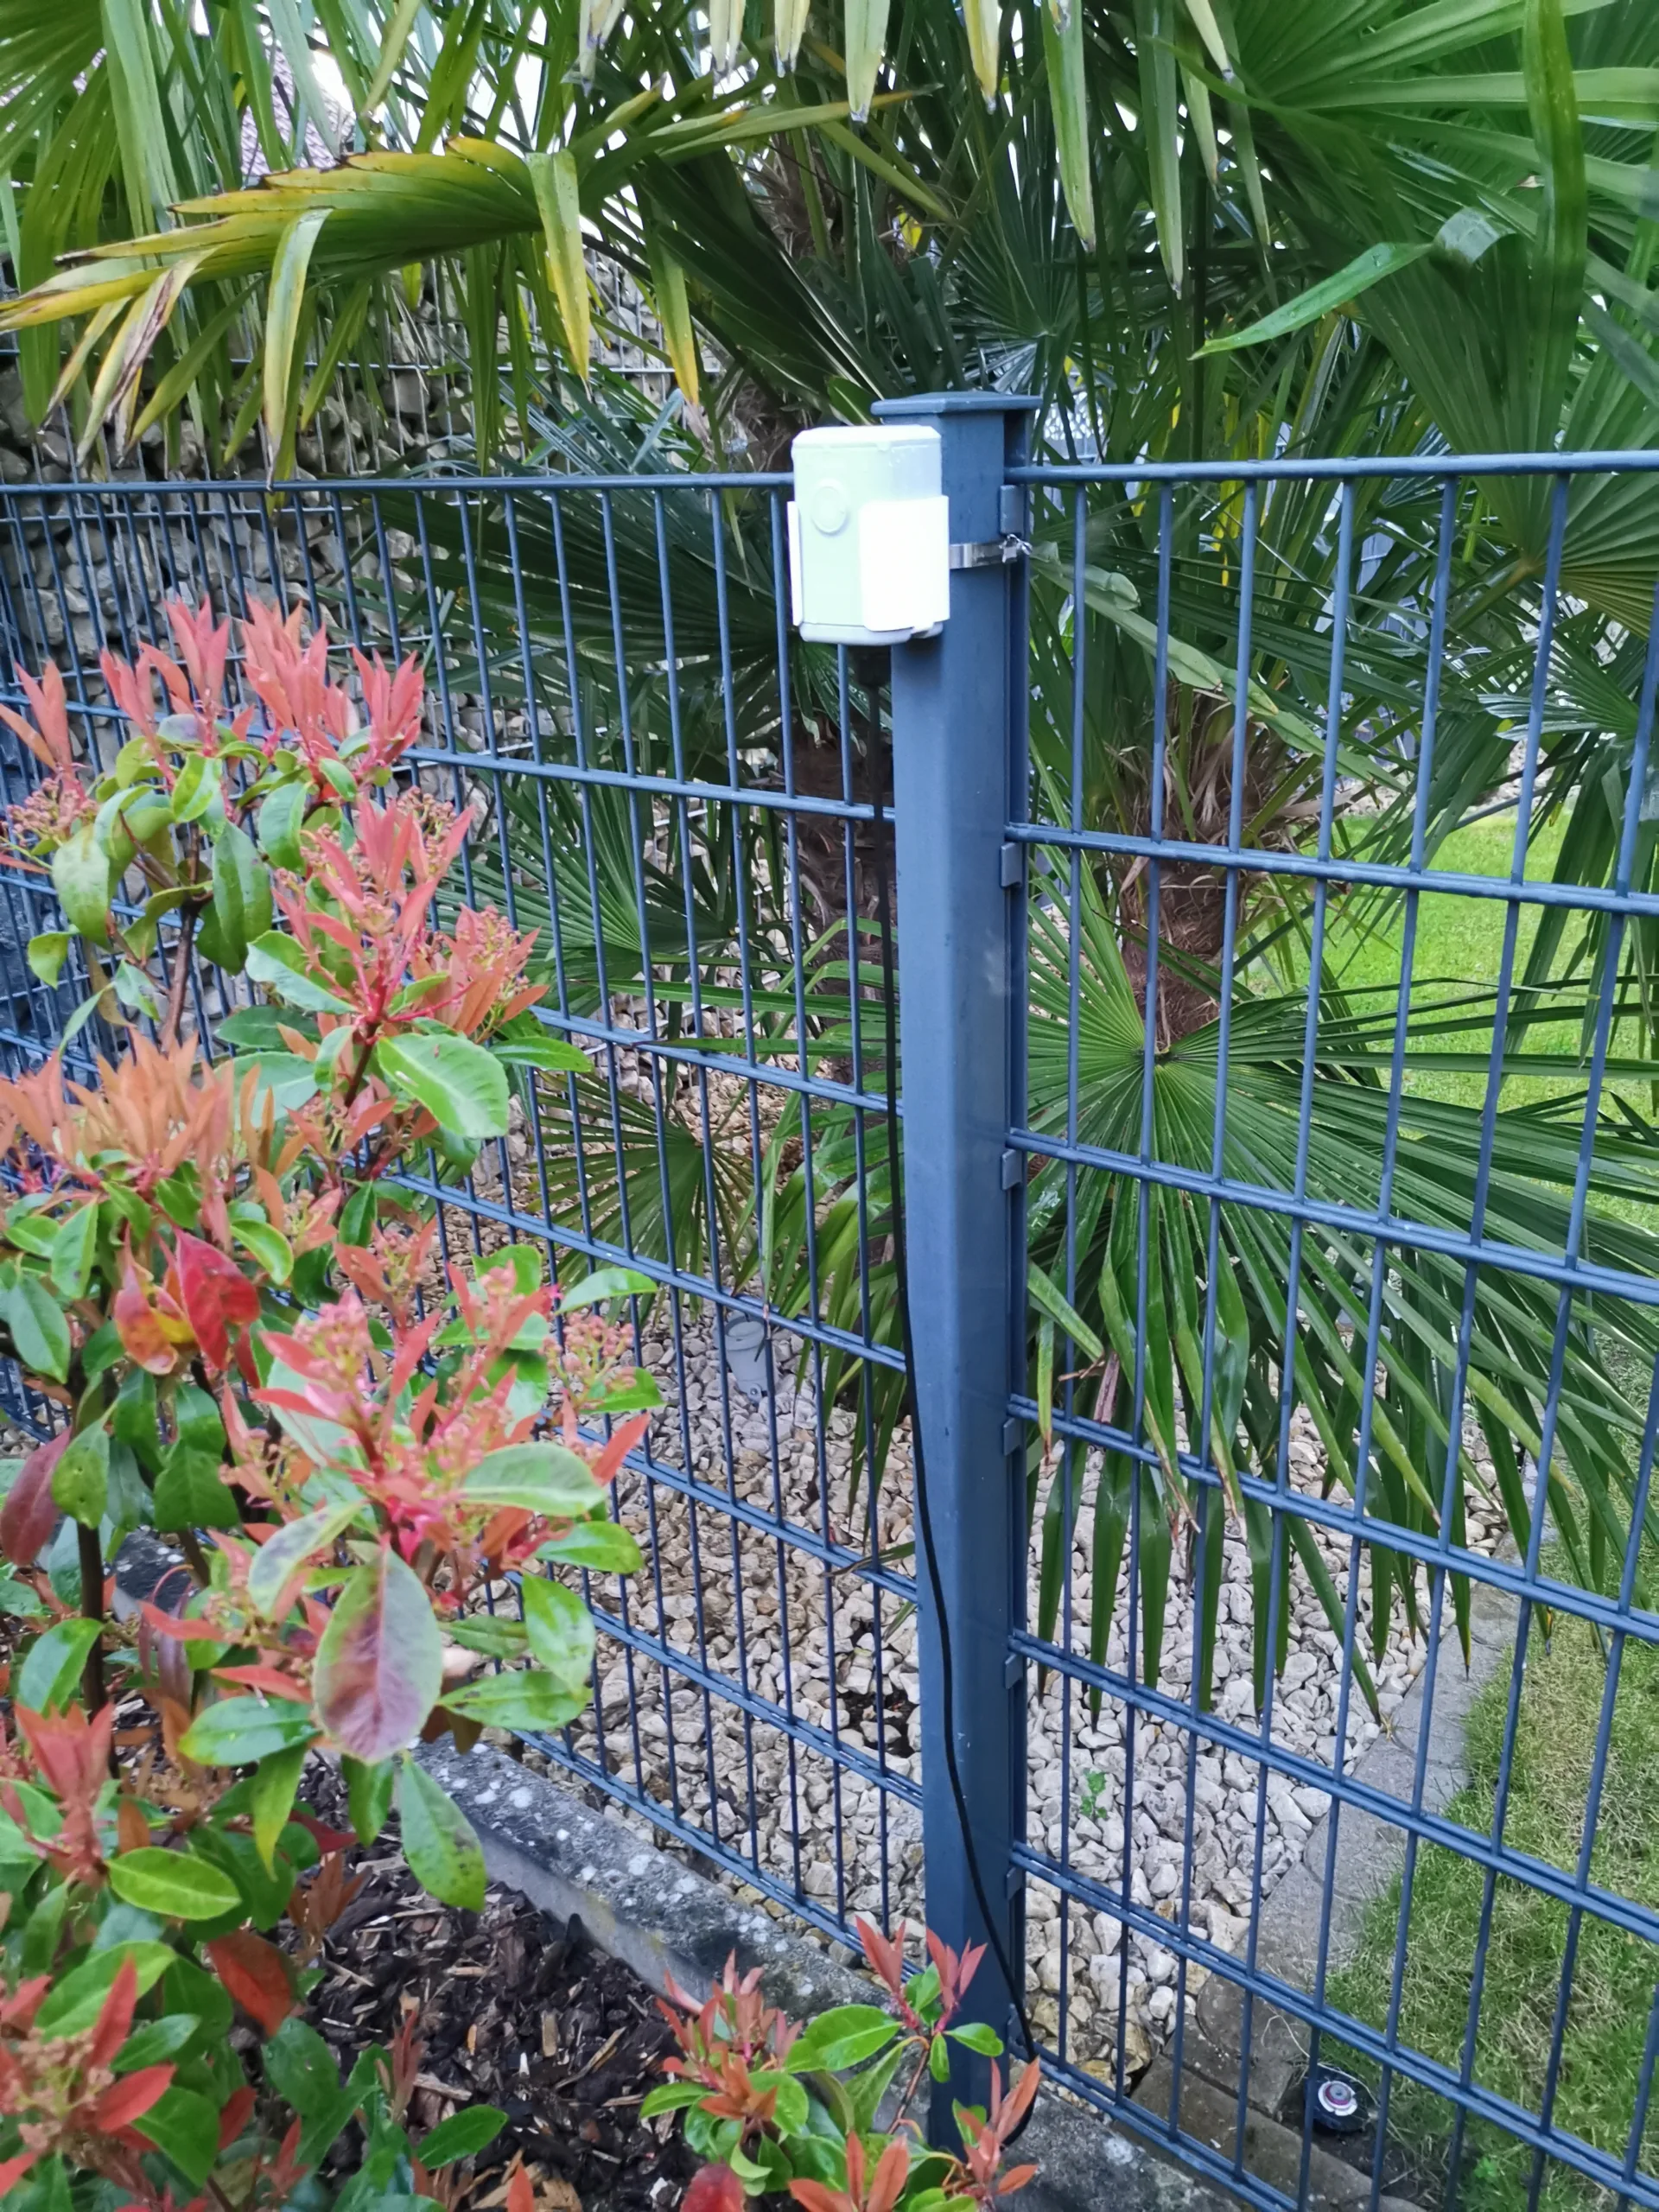
The Milesight EM-500 SMTC is more than just a soil moisture sensor. It can measure soil temperature and permittivity. It consists of two components that are connected with a cable. The above ground is the transmitter, the underground is the actual sensor. A mast holder is included.
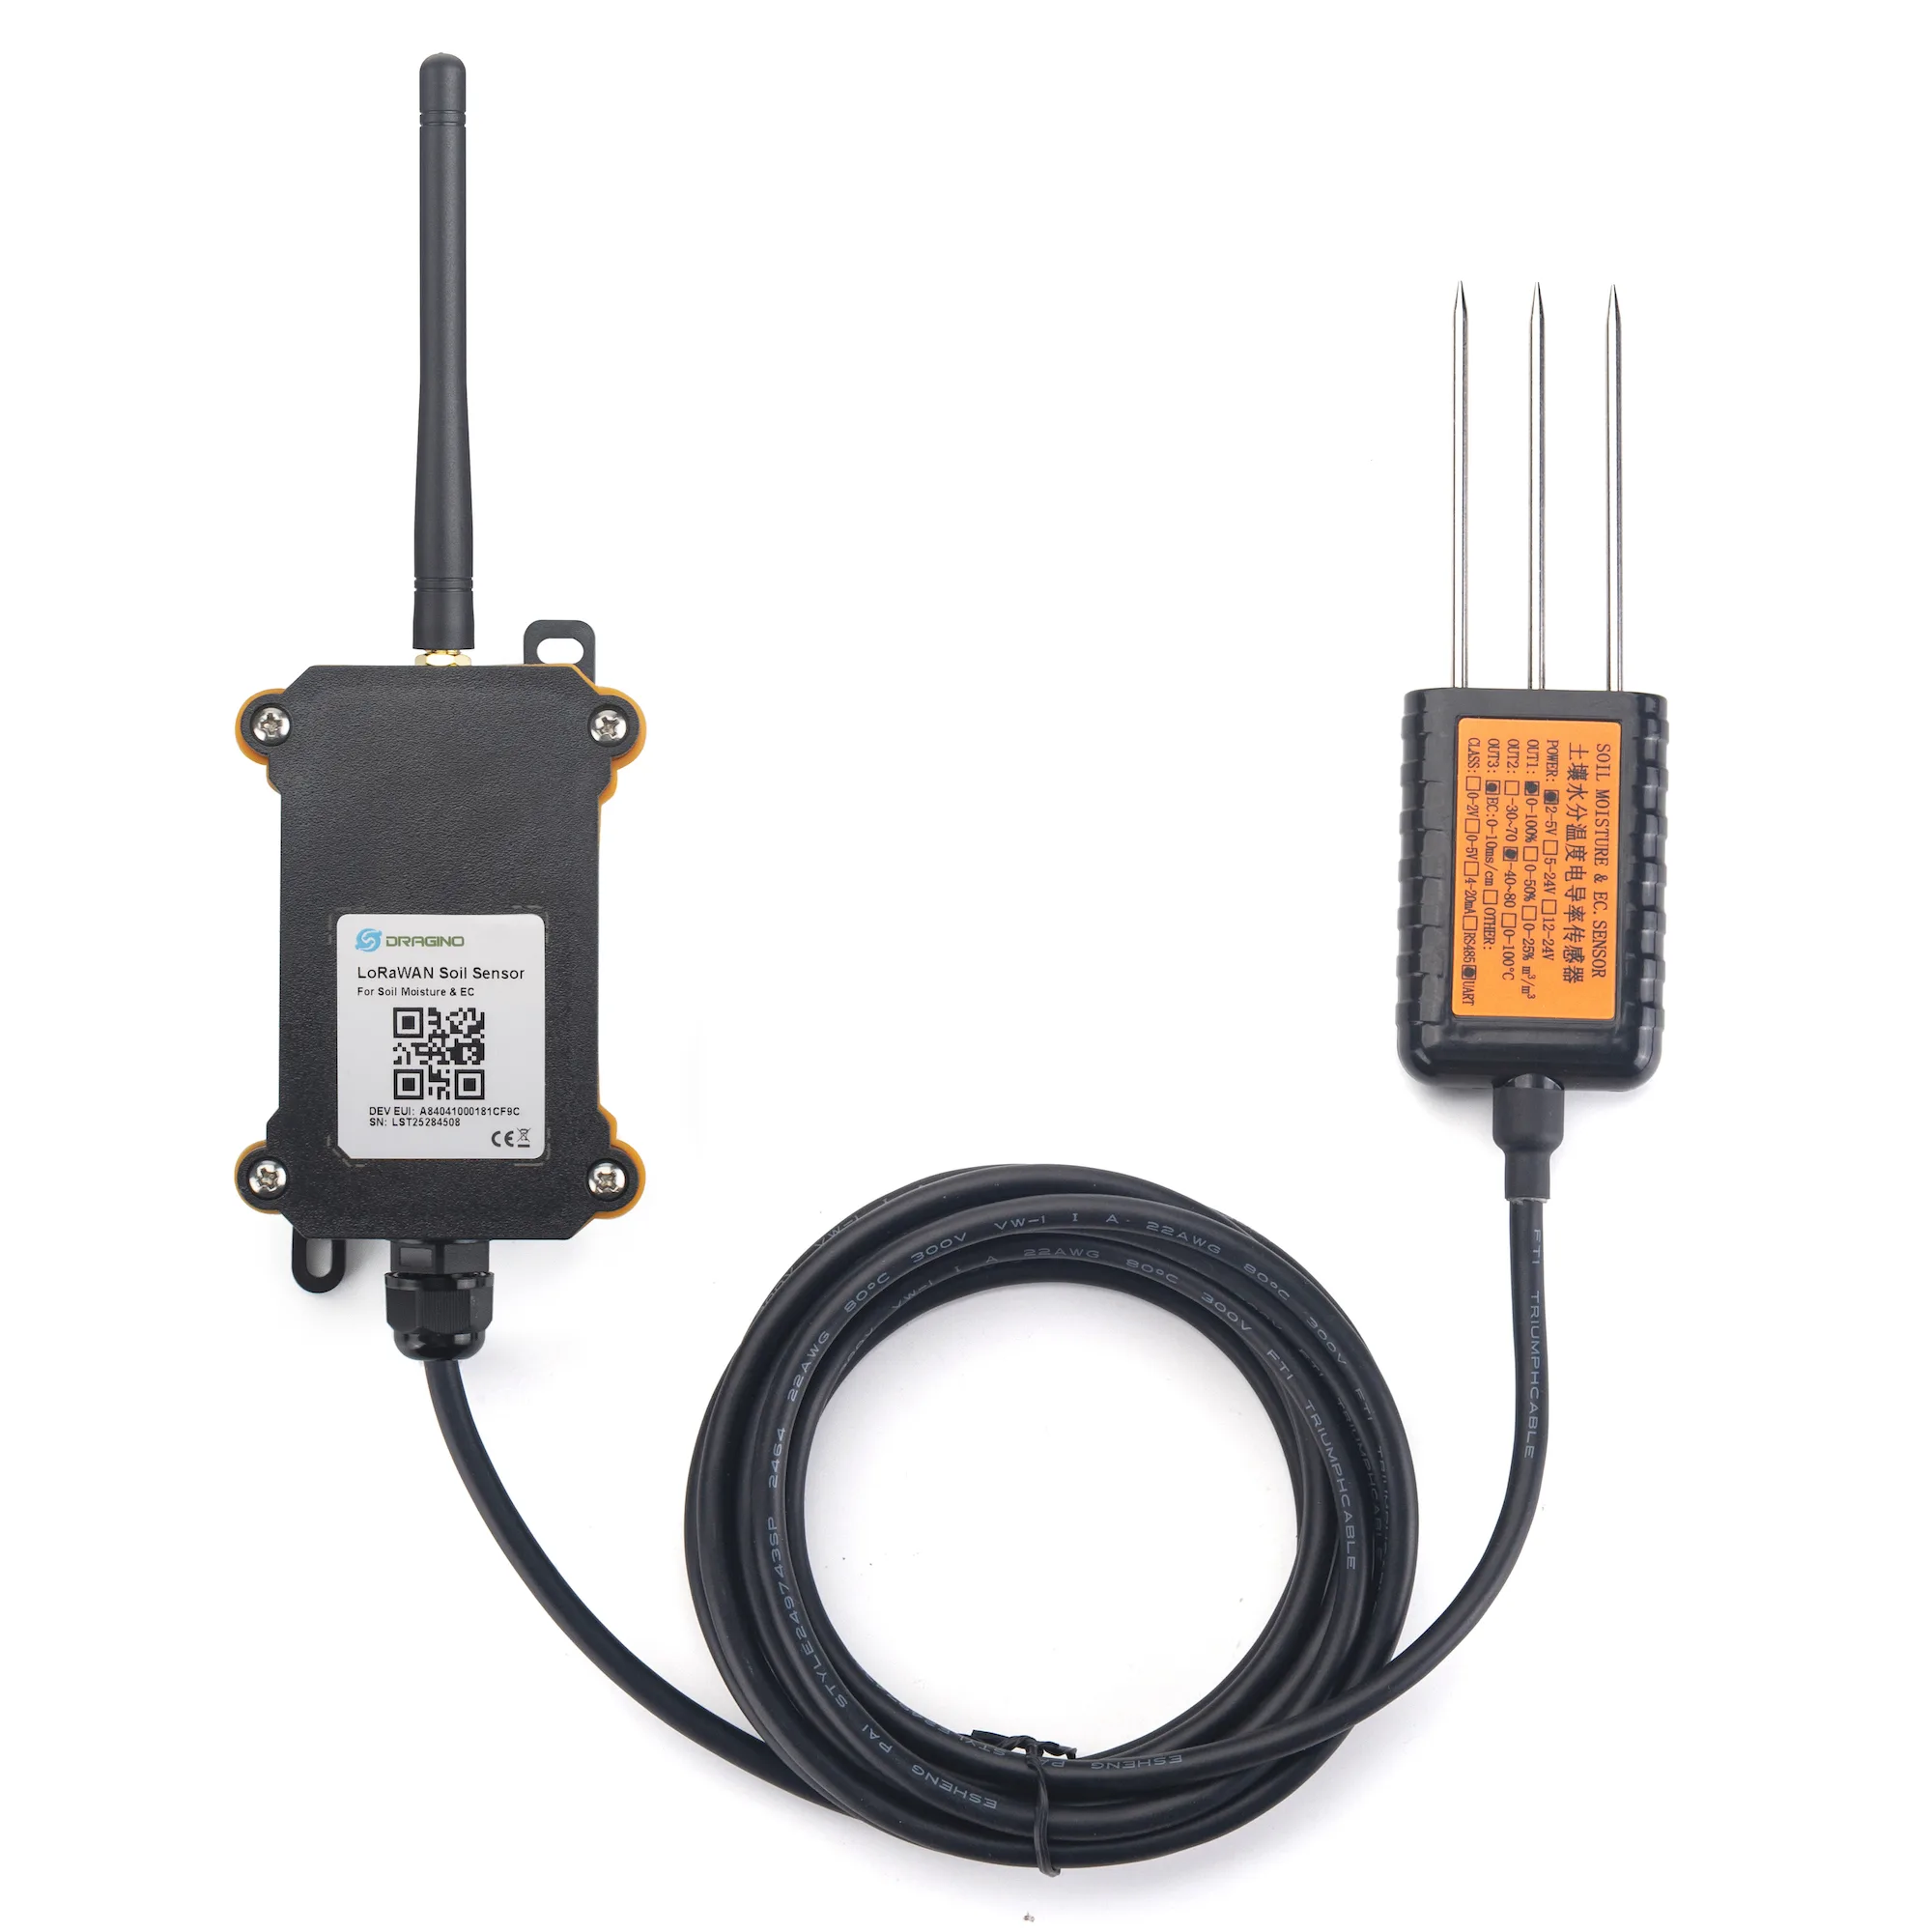
The Dragino LSE01 is similar to the EM500, it can also measure soil moisture, temperature and permittivity. All Dragino sensors seem to be similar, all products have the same transmitter.
ChirpStack
When setting up Chirpstack, it is important to first set up profiles for the sensors (“Device Profiles”). Here you record the sensors with their general device data. You can select the defaults using the “Select device-profile template” function. This entire configuration is necessary so that the binary sensor data can be converted into readable values. Therefore, the “Codec” function is also the most important function here.
However, it took me a while to realize that these codec specifications were outdated. The current codecs can be found here:
Milesight: https://github.com/Milesight-IoT/SensorDecoders
Dragino: https://github.com/dragino/dragino-end-node-decoder
To do this, simply select the right sensor, download the file for ChirpStack, open it with an editor and paste it into the codec field.
Next, create an “Application” and enter the sensors under “Devices”. It is also important to know the JOIN data of the sensors; these are usually printed on the devices, on the nameplate, in the device itself or in the accompanying documents.
Now that everything is set up, you have to trigger the JOIN on the sensors. This process first connects the sensor to your gateway - otherwise everyone could control your sensors. You can either do this with an APP (Milesight has the “Toolbox” APP) or you open the device and press a special JOIN button. Sometimes you just have to briefly remove the battery and plug it in, then the JOIN process is triggered.
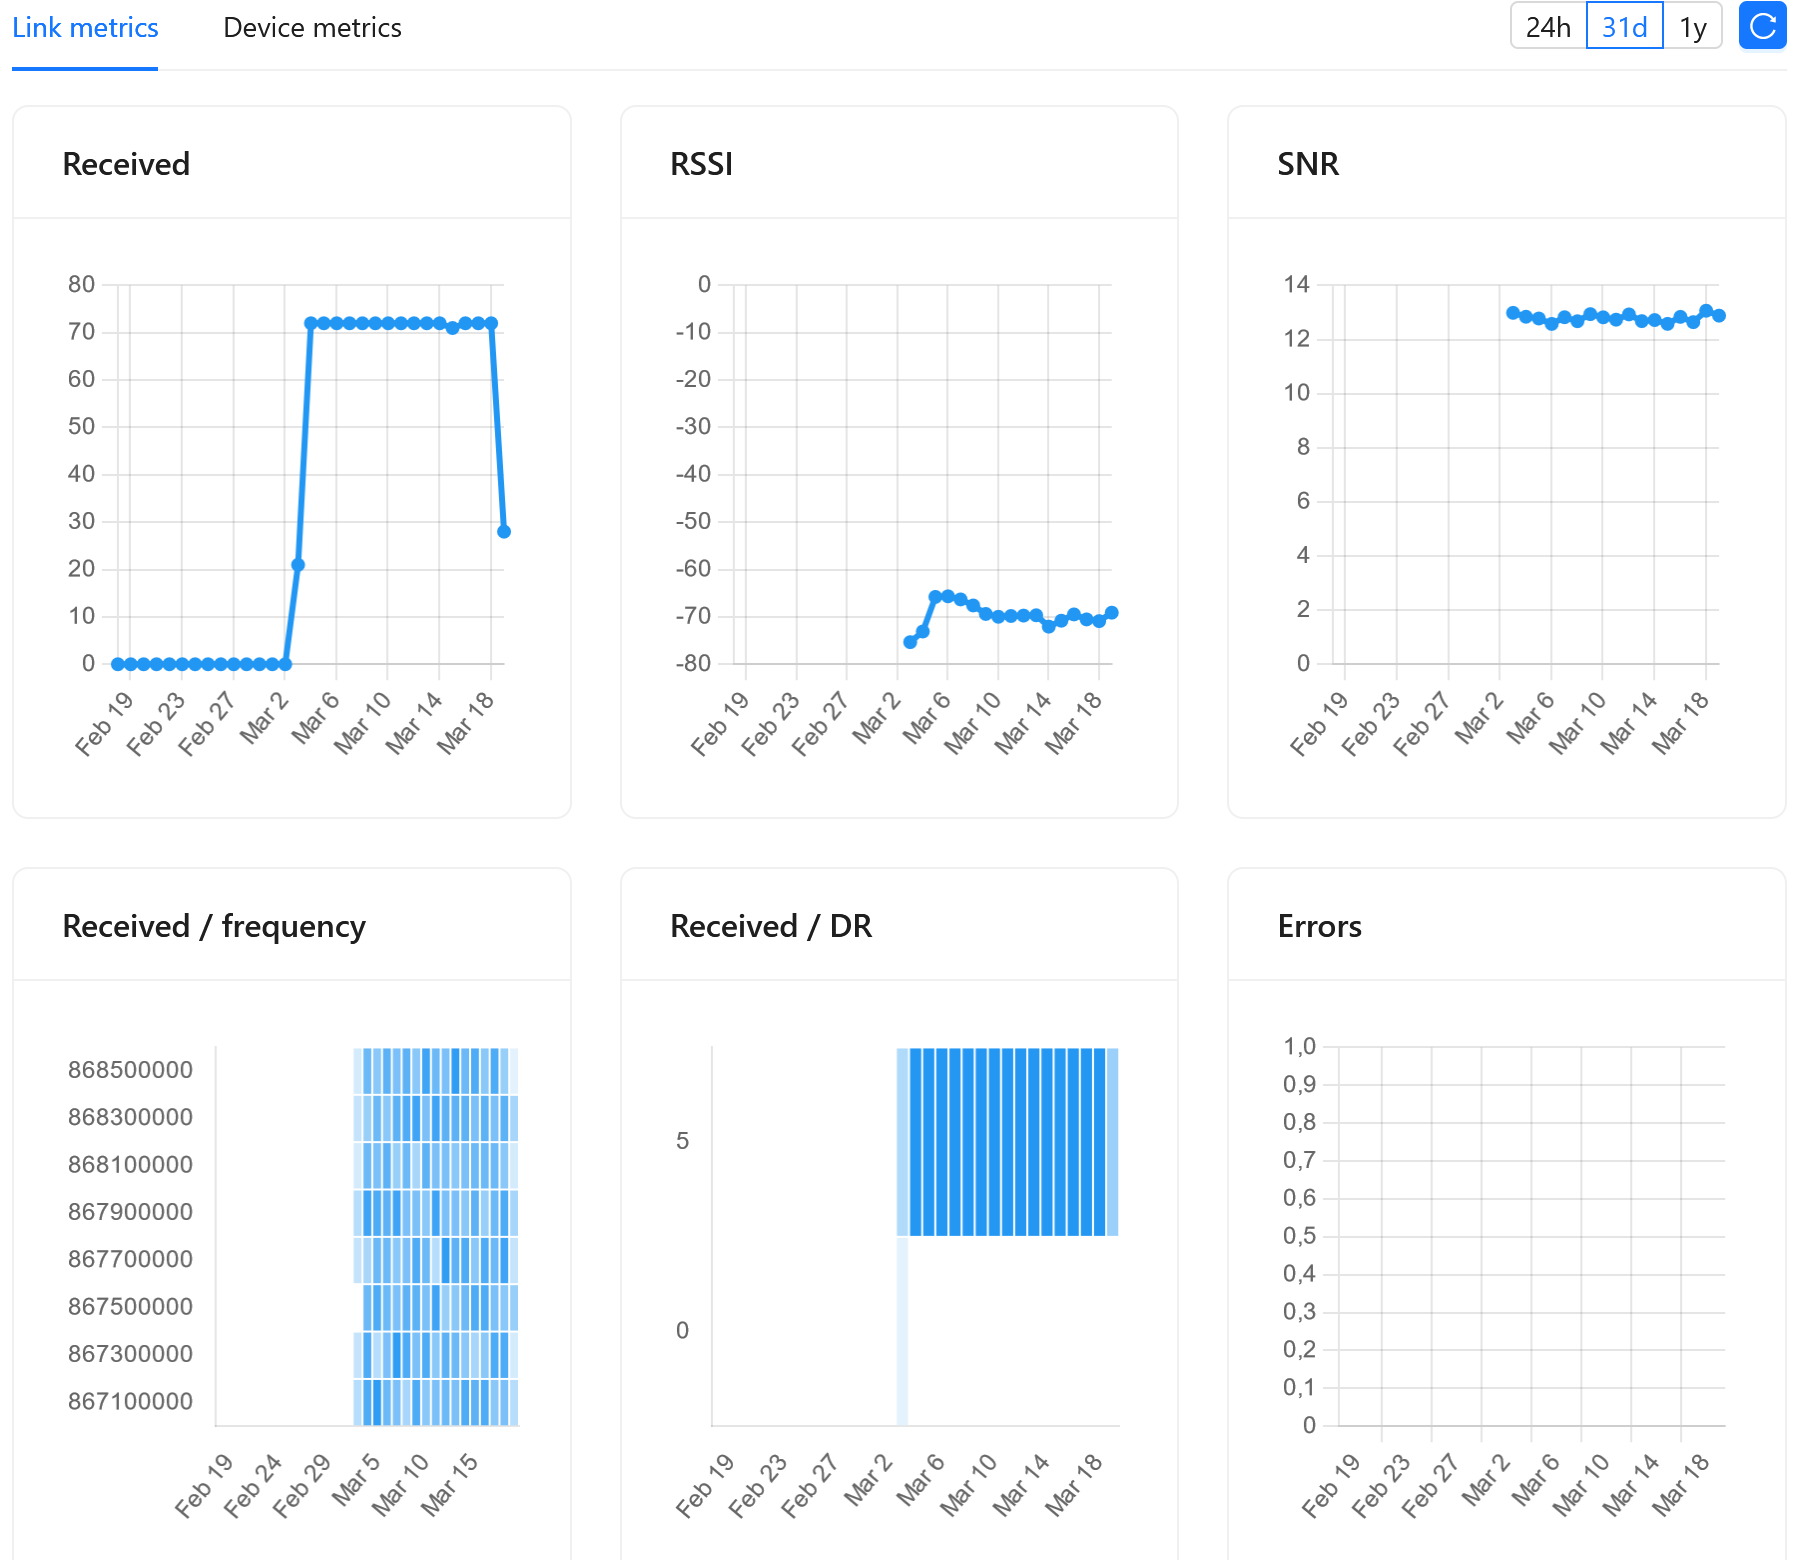
The data should now arrive in ChirpStack. But please be patient, the sensors only send a signal every 10 minutes, so this can take time.
MQTT
Chirpstack has its own MQTT broker, but you can also use your own MQTT. So that it receives the data from the Chirpstack MQTT broker, I set up an MQTT bridge and forwarded everything. The necessary program for this is called “Mosquitto”
The forwarder.conf in the /etc/mosquitto/conf.d folder looks like this for me:
connection bridge-01
address 192.168.0.50:1884
topic # out 0
topic # in 0
where 192.168.0.50:1884 is the IP and port of the Chirpstack MQTT broker
Once everything is set up, the values should appear automatically in OpenSprinkler as shown above. Now configure a program adjustment for this sensor, e.g. like this:
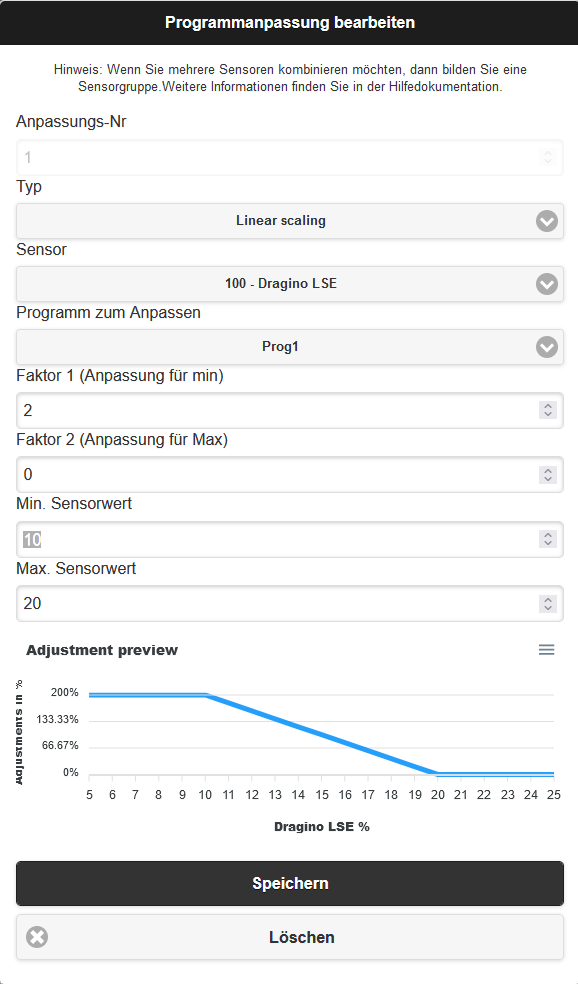
This keeps irrigation between 10% to 20% soil moisture. The irrigation adjustment is from 0 to 200%
Hello,
that sounds extremely interesting. I'm just wondering if you need the relatively expensive Milesight UG65-868M or if it does something simpler?
Of course, this also works with other LoRaWAN gateways. Since the integration takes place via MQTT, any compatible device can be used.
Unfortunately, with firmware 2.3.1 (164) when “MQTT Subscription” is selected, the MQTT Topic/MQTT Filter/Unit fields are missing 🙁
Even changing the browser didn't change anything. Is this a known bug?
Yes, that happens when you use the manufacturer's “original” website, which unfortunately lags behind development. Therefore, adapt accordingly as described in the instructions /su.
Then press Ctrl+F5 several times in the browser (or reload) so that the page is updated. Here is the link again:
Thanks! Works great and it is possible to integrate my Ecowitt weather station via Homeassistant => Mosquitto.