
Open Sprinkler Installation
Homepage › Forums › Introduced › Open Sprinkler Installation
- This topic has 0 replies, 1 voice, and was last updated 2 years, 10 months ago by
.
-
AuthorPosts
-
22. June 2021 at 1:59 #24492
Anonymous
InactiveOpen sprinkler installation, 40 stations (24 active), Gardena irrigation, garden pump, pool control, Homemetic integration, weather station, radio remote control, etc.
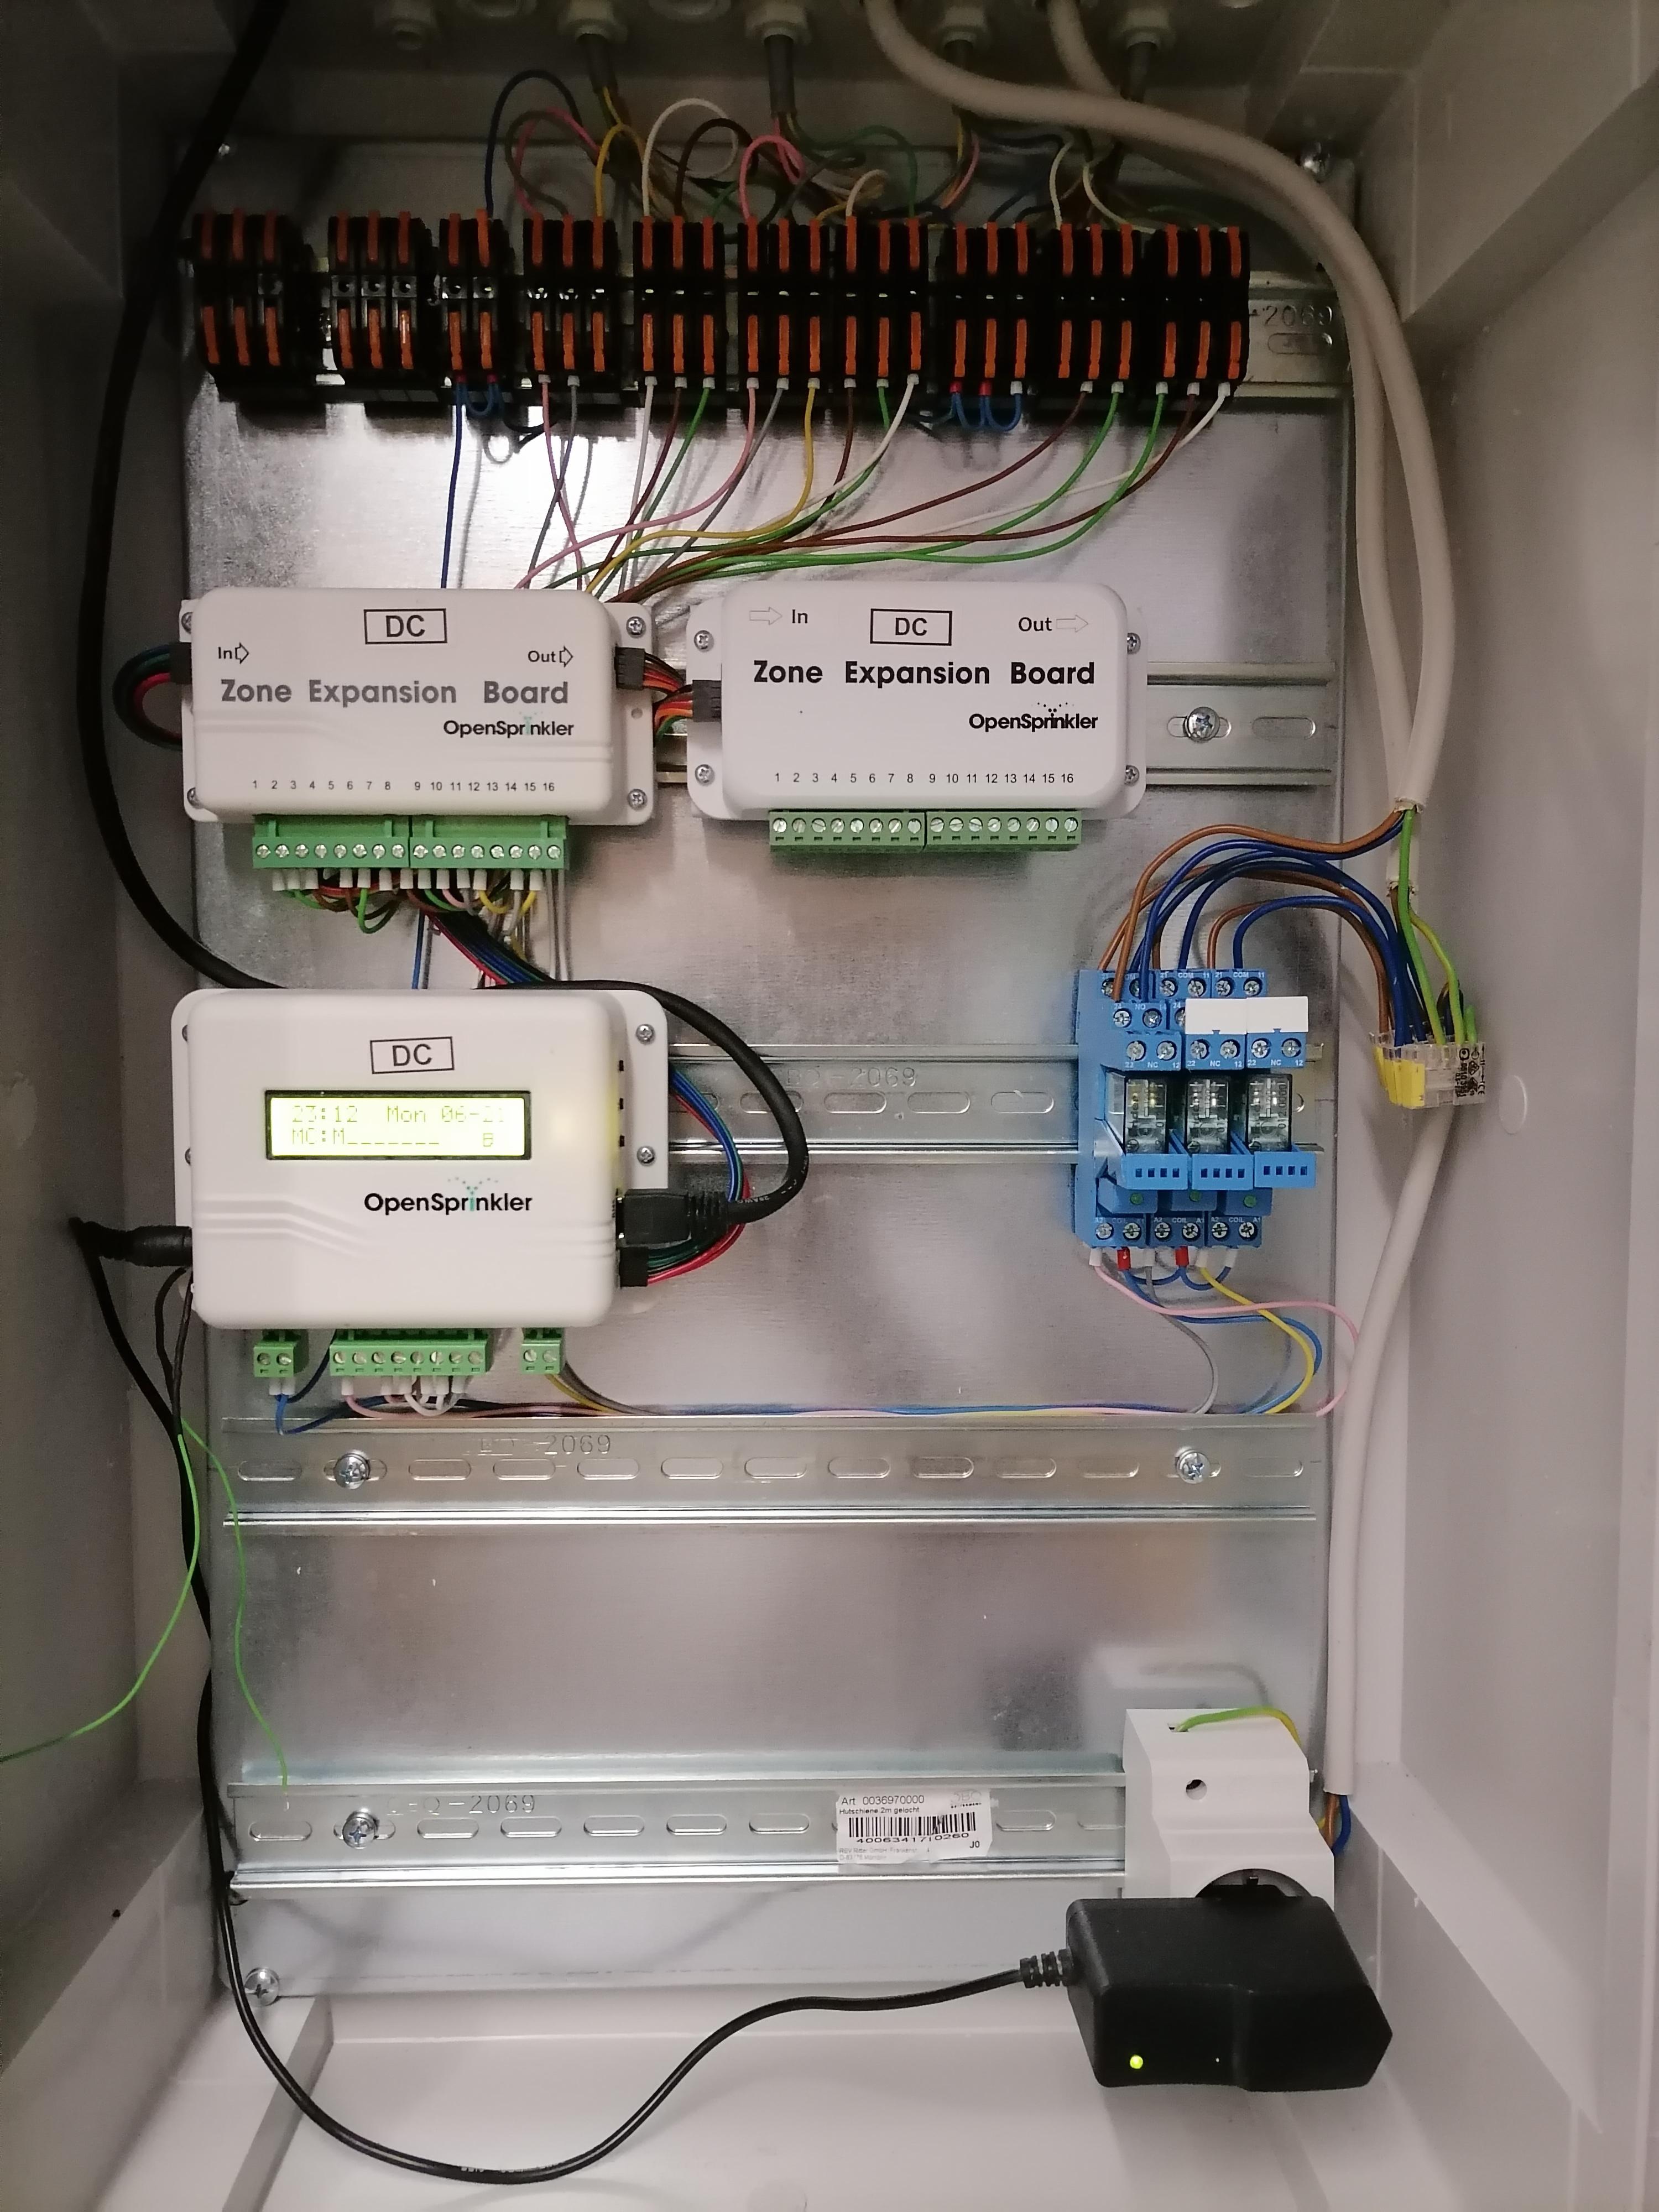
Over the past few nights I have neatly installed the entire irrigation electronics and electrical engineering installation in the IP67 box and finally said goodbye to the flying wiring.
The irrigation project began 4 years ago (2017) with an OpenSprinkler Main Controller V2.3, which is still in use today. However, this now comes with 2 expansion boards, a total of 40 station outputs, of which only 24 are currently used. I installed the second expansion board as a “reserve” because new irrigation zones are added every now and then.
The following are controlled via Open Sprinkler:
Garden pump
10 x Gardena square pop-up sprinklers
2 x Gardena spray sprinklers
3 x Balcony Box Irrigation
2 x Plant Troughs
1 x underground lawn edge irrigation
3 x irrigation strands for a total of 48 shrub plants
3 x valve controlled water sockets
1 x pool filling
1 x pool filter pump (prepared)
1 x pool chlorine generator (prepared)
1 x outdoor lighting / outdoor socket (planned)
Hardware:OpenSprinkler v2.3
2 x OpenSprinkler Expansion Board
3 x DIN rail relays 12V
9V plug-in power supply
IP67 housing 60cm x 40cm
8 x Gardena 3-way valve boxes, 7 of which are equipped with 3 valves each (1 box as a reserve)
8mm, 20mm, 25mm and 32mm PE pipes (depending on flow rate, main pipes in 32mm)
Bechwand pool, with filter system and choir generator (salt water electrolysis)
Special features:All electronics installed in the basement. From there, 5 cables with 7 wires each lead to the valve boxes (6 valves are controlled per cable + 1 x common, so 2 Gardena 3-way valve boxes per cable).
3 of the OpenSprinkler outputs directly control 12V relay coils (visible in photo). The 3 relays each switch the following 230V devices with 2 poles (reverse polarity protection): fountain pump, pool filter pump, pool chlorine generator.
The well pump is of course configured in OS as “Main 1”.
Filter pump is configured as “Main 2” to ensure that the filter pump always runs when the chlorine generator is switched on. The well pump is already switched via the relay, the filter pump and chlorine generator are not yet connected to the relays because the power cables for the devices at the pool are not yet routed through the basement wall. The idea is that you can time the filter system including the chlorine generator via OpenSprinkler, typically 3 hours a day, if there is a lot of swimming and/or high temperatures, the pool needs more chlorine. Next project: waterproof cable entry for the pool equipment through the basement wall.
Integration into home automation: Home control center (Homematic) sends HTTP requests to OpenSprinkler via script and uses them to control the following OpenSprinkler commands: Switch individual stations on/off (signals from the remote control)
Start irrigation programs (signals from the remote control)
Rain delay (signal from weather station)
About the remote control: It is simply extremely practical when you work in the garden, need water from the water hose every now and then and then simply have the small, handy remote control in your pocket with which you can activate the garden pump or individual irrigation circuits or even start entire irrigation programs. Of course, you could also use your smartphone with the OS app for this, but the touchscreen is difficult to use with soil-contaminated fingers or gardening gloves. It is a Homematic remote control, this sends to the Homematic central station in the house, where a script is started which sends the corresponding Http request to the OpenSprinkler controller.
Regenverzögerung durch Wetterstation: Ähnlich wir die Fernbedienung funktioniert auch die Regenverzögerung durch die Wetterstation. Bei der Wetterstation handelt es sich wieder um eine Homematic-Komponente. Bei einsetzendem Regen, sendet die Station an die Homematic-Zentrale. Dort wird wiederum ein Script gestartet, welches einen entsprechenden Http-Request an OpenSprinkler sendet, wodurch die Regenverzögerung in OS aktiviert wird. Hört es auf zu regnen, so findet eine weitere Kommunikation zwischen den Steuerzentrales statt: Ab Regen-Ende bleibt die Regenverzögerung in OS für weitere 12 Stunden aktiv. Auch dafür gibt es in ein OS-API-Kommando. OpenSprinker kann zwar Wetterdaten auf dem Internet erhalten, diese sind aber nicht präzise genug, um festzustellen, ob es konkret auf dem eigenen Grundstück regnet oder die Regenwolke daran vorbei zieht. Ohne einen eigenen Regensensor (in meinem Fall die eigene Wetterstation) kann es schon vorkommen, das OS bewässert, obwohl es gerade regnet. Dann steht schon mal der Nachbar vor der Tür und weißt darauf hin, dass man trotz strömendem Regen den Rasensprenger eingeschaltet hat. Um sich diese Peinlichkeit zu ersparen, braucht es den eigenen Regensensor vor Ort.
Pool filling via OS and garden pump: In order to completely refill the empty pool, a timer is required. In my case the pump has to run for 14 hours. OS then switches off the pump and thus prevents overflow. In addition, the pool must be refilled in the evening when there is strong sunshine (evaporation). To do this, the pump and valve must be activated for 10 to 20 minutes, depending on the outside temperature. The water inlet to the pool is simply a 25mm PE pipe that is connected to one of the Gardena valves and ends on the other side at the edge of the pool. It would be desirable to have a level sensor on the pool in order to fill it exactly to the target height. The current solution only calculates the duration of the pool filling based on the outside temperature during the day, which can lead to deviations over several days that have to be corrected manually.
Ventilgesteuerte Schlauchanschlüsse: Bis vor kurzem hatte die die Gardena Wassersteckdosen einfach an die Wasserzuleitungen zu den Ventilboxen angeschlossen. Um Wasser aus den Dosen zu entnehmen, brauche man nur einen Gartenschlauch per Gardena-Kupplung an die Wassersteckdosen anzuschließen und die Gartenpumpe einzuschalten. Dabei sollten alle Ventile ausgeschaltet sein, um den vollen Pumpendruck auf dem angeschlossenen Gartenschlauch zu haben und nicht zeitgleich irgendwelche Regner etc. mit halbem Druck laufen zu lassen. Das ließ sich in OpenSprinker gut konfigurieren, indem man eine freie Station als “Schlauch” benennt und diese mit “Main 1” (= Gartenpumpe) zusammen konfiguriert. Dazu braucht man nicht einmal einen “echten” Stationsanschluss im OS-Controller zu benutzen, sondern man kann im OS-Konfigurationsmenü ja mehr Stationen konfigurieren, als tatsächlich vorhanden sind. Ich nenne diese physikalisch nicht vorhandenen Stationen mal “virtuelle Stationen”. “Schlauch” kann so eine virtuelle Station sein, deren Funktion einfach nur darin besteht, den “Main 1” (=Gartenpumpe) einzuschalten, ohne dass dabei irgendein Ventil aktiv ist. Das Wasser wird dann durch den angeschlossenen Gartenschlauch aus der Wassersteckdose zwischen Pumpe und Ventilbox entnommen. Eine weitere “virtuelle Station” heißt bei mir “Pause”. Sie steuert keinen “Main” an, die Pumpt ist also aus. Die “Pause”-Station dient lediglich dazu, bei langen Bewässerungsprogrammen der Pumpe mal eine Pause zu gönnen, oder aus sonst irgendwelchen Gründen eine Pause in ein Programm einzubauen, oder auch um in manuellen Bewässerungen eine Pause vorzusehen.
Zurück zum Thema: Meine Schlauanschlüsse (Wassersteckdosen) waren also bislang direkt an die Hauptwasserrohre zwischen Pumpe und Ventilbox angeschlossen. Das ist sehr praktisch, weil man dann keine Ventile für die Wassersteckdosen braucht und einen angeschlossenen Schlauch dennoch über OS steuern kann. Diese billige Lösung bringt aber auch Nachteile: Vergisst man den Schlauch von der Wassersteckdose zu entfernen (und hat auch sonst keine Stopp-Vorrichtung im Gartenschlauch), so ist der Schlauch auch aktiv sobald OS ein Bewässerungsprogramm startet. Man zieht sich also Abends ist Haus zurück, im Glauben, das Bewässerungsprogramm wird schon seinen Dienst tun, um später festzustellen, dass der Rasen gar nicht bewässert wurde, da das gesamte Wasser stundenlang durch den Gartenschlauch ausgetreten ist. Besonders schwierig wird es, wenn andere Familienmitglieder Gartenschläuche anschließen ohne dass ihnen bewusst ist, warum der Gartenschlauch unbedingt vor Start des Bewässerungsprogramms entfernt werden muss. Darüber hinaus gibt es Situationen, in denen man bewusst einen Gartenschlauch in das Bewässerungsprogramm einbeziehen möchte. Zum Beispiel ist das Fall, wenn neue Pflanzen eingepflanzt wurden, die vorübergehend besonders stark bewässert werden sollen, sodass man einen angeschlossenen Gartenschlauch an der Pflanze enden lässt. Das funktioniert nicht, wenn der angeschlossene Gartenschlauch das gesamte Bewässerungsprogram stört, weil durch ihn ständig ein Teil des Wassers abfließt.
All of these considerations recently led me to control all three water sockets with their own valves. Now I no longer have to worry about whether there might be a hose connected that someone in the house accidentally left there. The irrigation program is no longer affected. I can also switch water sockets specifically at any time, for example to specifically water a plant using a garden hose. Another application example is the garden shower, which is permanently connected to the water socket on hot summer days and can be activated for just 3 minutes using a radio remote control (see above). Disadvantage of the valve-controlled hose connection: costs for the additional valves, lines, cables, etc. and the occupancy of one OS station per water socket. You could also connect all water sockets electrically to an OS station, or supply all water sockets together via a valve, but if so, then do it right: now I want to be able to control each water socket individually and via its own valve.
Further plans:Connection of the pool devices (filter pump and chlorine generator) to the relays in the basement so that they can also be controlled via OpenSprinkler. In addition to the cables that have already been routed, the power supplies for the pool devices must also be routed through the outer wall of the basement in such a way that no groundwater can penetrate into the basement through the drill holes.
Level sensor on the pool to prevent the pool from overflowing or insufficient filling, as well as to be able to monitor the filling process remotely. Possible solutions: capacitive level meter, ultrasound, float switch, electrical connection through the (salt) water in the pool. I'm leaning towards a capacitive level meter, possibly an additional float switch to precisely determine the final level. In contrast to the rain barrel, the problem with the pool is that people bathe in it, which creates wave movements and therefore fluctuating sensor values.
Balkonkästen: Ich verwende die Balkonkästen von Lechuza. Die sind teuer, sehen aber gut aus und haben ein Wasserreservat mit Überlauf nach unten. Über dünne transparente Schläuche, die vom Ventilkasten an der Hauswand hoch zu dem Balkonen und Fenstern führen, werden die Blumenkästen täglich mit Wasser befüllt. 2 bis 4 Minuten reichen für alle Kästen zusammen, die gemeinsam über ein Ventil befüllt werden und dann laufen alle aus dem Überlauf über. Ich stelle die Bewässerungsdauer so ein, dass auch der letzte Kasten überläuft, so weiß ich, dass alle voll sind. Zu viel Wasser macht nichts, dafür haben die Kästen ja den Überlauf. Die Pflanzen in den Kästen “ziehen” ihr Wasser, je nach Bedarf, über die porösen Steinchen im Boden der Kästen. Die Erde in den Kästen ist also immer nur mäßig feucht, egal wie viel Wasser man in das Reservoir der Kästen pumpt. Wenn dieser Bewässerungskreis läuft, tropft es am ganzen Haus aus den Blumenkästen herunter. Ich habe darüber nachgedacht, eine Rückleitung an jeden Kasten zu legen, für das übergelaufene Wasser, damit es nicht herunter tropft, aber das wäre schwierig anzubringen und was solls, dann tropft es halt.
More irrigation zones: There is always something new that needs irrigation: vegetable beds, flower pots, hedge bushes that have not yet been watered. Today I installed the second OS expansion board in the new electronics box. No zone on the new board is occupied yet, but that will definitely happen.
A more powerful pump: So much is irrigated that the programs run for several hours every day until the 24 stations are completed. If the pool is filled for hours, the pump runs continuously on hot days. If that's no longer enough, you'll need a more powerful pump, perhaps a second well. This would fill the pool quicker, have more sprinklers running at the same time, etc. I'm thinking about switching from the current suction pump to a submersible pump, but I'm not sure yet. The pump always draws a few air bubbles, hopefully this shouldn't happen with the submersible pump. Any ideas, suggestions or recommendations about submersible pumps?
So much so far. There are probably more details that I haven't noted yet. Maybe more later. I can also post more photos if you're interested. But now I've earned the AD converter... -
AuthorPosts
- You must be logged in to reply to this topic.