
Monitoring and control
The new “Monitoring and Control” function fulfills a wish of many customers - especially farmers - because now the OpenSprinkler can not only measure irrigation and sensor data, but also actively use it to control devices. Examples:
- A cistern has an analog sensor that indicates the filling level from 0-100%. If the value falls below 10%, the make-up should be activated and raise the level to 15%.
- A polytunnel has electric ventilation windows. These should open at temperatures above 25°
- A greenhouse has electric ventilation. This should be activated when the humidity is above 95%.
- And of course many other scenarios are conceivable.
This is now possible with our firmware 2.3.3 (168).
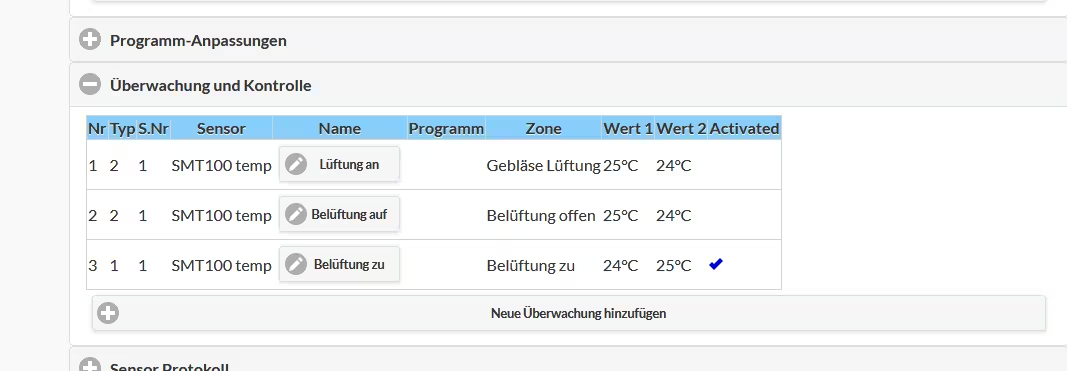
Click on “Add new monitoring” or on one of the buttons in the list to edit a monitoring. The following dialog then appears:
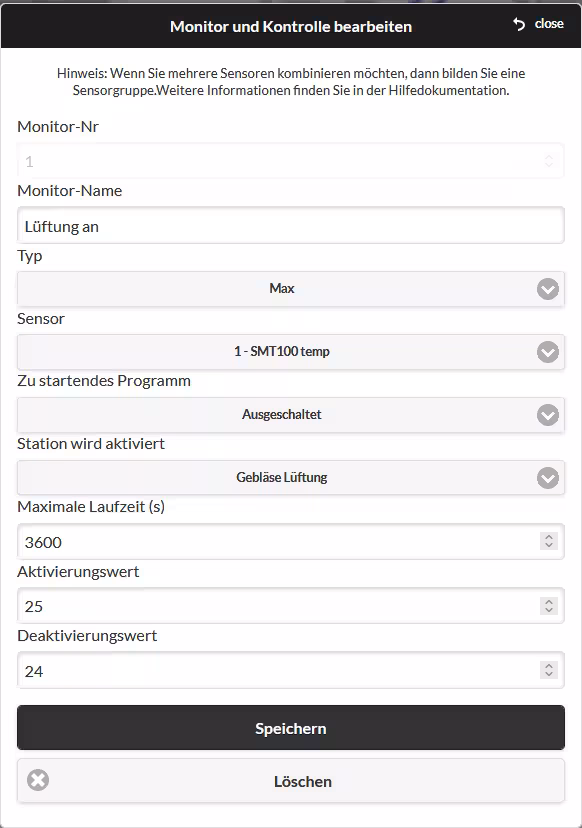 Now enter the desired values:
- Monitor number: A unique number for the monitor, important for the order
- Monitor Name: Give the monitor a name
- Type: Currently there are only two control functions, “Min” (minimum value) and “Max” (maximum value). For “Min”, falling below the activation value and for “Max” exceeding the activation value lead to activation.
- !NEW! From firmware 2.3.3(172) additional support for AND / OR / XOR / NOT and digital rain sensors (on SN1/2). Other monitors can be connected together with AND/OR/XOR/NOT. The rain sensor can be configured for both rain and “non-rain” and thus switch events.
- Sensor: Select the desired sensor. If you want to combine several sensors, first form a group and then select the group.
- Program to start: When the activation value is reached, this program will be started.
- Station is activated: When the activation value is reached, this station is activated. If the deactivation value is reached, this station is deactivated.
- Maximum runtime (s): Defines the maximum runtime of the station to be started in seconds
- Activation value: For example, for a temperature sensor, enter the temperature from which the program or station should be activated. The unit is determined by the assigned sensor.
- Deactivation value: For example, for a temperature sensor, enter the temperature above which the station should be deactivated. The unit is determined by the assigned sensor.
Then confirm with “Save”.
Notes:
- For “Max” the “Deactivation value” should be smaller than the “Activation value”, for “Min” vice versa.
- A station can also be a remote station or HTTP station, e.g. to control sockets.
- When connecting consumers directly, please use a relay (AC version: 24VAC relay, DC version 3-32V solid state relay)
As soon as an activation value is reached, the name of the monitor appears on the home page.
This extension is just the first step, we will add more features. Plans include: Send notifications when exceeded