
Admin
Forum Replies Created
-
AuthorPosts
-
Admin
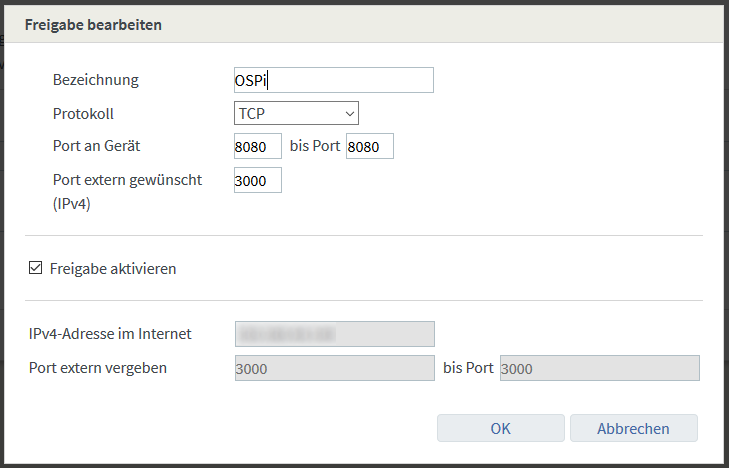
KeymasterThis is how port sharing works for me. However, you have to differentiate between OSPi and OpenSprinkler 3, since OSPi uses port 8080 and OpenSprinkler 3 uses port 80.
So set it up for OSPi like this:
And so for the OpenSprinkler 3:
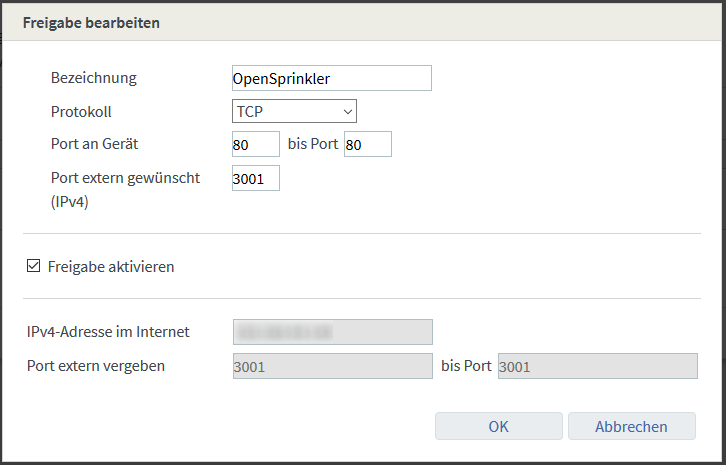
As you can see here, the OSPi can be reached under the external IP port 3000 and the OpenSprinkler 3 and the same external IP port 3001.
In this way you can successfully remotely control several OpenSprinklers from the Internet.
The option “Allow this device for Internet access via IPv4 (Exposed Host)” must NOT be activated.
Together with the MyFritz release, you can now configure it in the OpenSprinkler app.
1. In the OpenSprinkler app, select the menu item “Manage locations” at the top left and press “Add / Manually Add Device”
2. Enter a name in the “OpenSprinkler Name” field. In “OpenSprinkler IP” enter the MyFritz release, followed by a colon and the port (see above 3000 or 3001 or your chosen port)
3. Then the password. Note: If you still have “opendoor” as your password, now is a good time to change it, because from now on the entire Internet can access your OSPi or OpenSprinkler!
4. Confirm with “Save”. Complete. If the “Connect” symbol turns green, then everything works!
Note: If you are within your WLAN, the Fritz!Box usually does not allow a connection via MyFritz. Deactivate the WLAN function on your smartphone and connect via the mobile network to test this function!
By the way, sharing only works via HTTP! HTTPS only works in conjunction with an HTTP to HTTPS proxy and a corresponding HTTPS certificate (e.g. with Apache2 and OpenSSL self-signed certificate). I will deal with this topic separately when I get the chance.
KeymasterThen it occurs to me that other reasons for stopping irrigation could be:
– Rain or soil moisture sensor has been activated
– Weather-dependent irrigation is activated and reduces the irrigation time23. August 2020 at 0:24 in reply to: Questions about the ports of the OSPi 1.5 (COM, +5V, GND, SN1/2) #22308KeymasterHello,
so:
1. 2x COM: These are both connected and only serve to simplify the wiring. If you have more than 20 solenoid valves, you should distribute them across both COM ports to reduce the current load on the contacts. Otherwise you can do this, but you don't have to.
2. 2A 24VAC Adapter: Yes, this also powers the Raspberri PI. Since version 1.5, this can be up to 10W (5V x 2A). This should be sufficient for most applications. However, if you connect high consumers like hard drives to the USB port, this will hardly be enough and you should connect the Raspberri PI adapter additionally.
3. Just do not connect the GND to the housing! The two signal inputs are switched via GND+SN1 or GND and SN2. So a signal is triggered when GND is present at SN1 or SN2. VIN or +5V is intended for connecting external sensors that require power, such as our soil moisture sensor.
Furthermore, we recommend taking a look at the OpenSprinkler firmware manual, which you can find in the download area. Here all connections are explained (they are the same as with the OpenSprinkler 3.2)
KeymasterSo to me it sounds like there is another program running on your OSPi that is also accessing the IO ports. If you have experimented with various home automation or other control applications, please uninstall them and try again.
KeymasterPlease export the configuration and use the support function (https://opensprinklershop.de/support) to send
KeymasterHello,
"Two days ago, 9 waterings went without any problems. Today I only managed 6."
Do you mean AT THE SAME TIME? Your power supply will hardly be able to do that.
Have you ever measured the resistance between COM and the zones?
And the voltage while the irrigation is running?
You may have a short circuit or a solenoid valve is damaged and is using too much power.
OpenSprinkler never aborts a running program on its own, I know the source code. However, if the Raspberry PI restarts due to loss of power, or the OpenSprinkler service on the Raspberry PI is stopped, only then will the program be forcibly terminated. This would also explain that you don't have a log.
KeymasterThat actually doesn't work. Here you would then have to use a normal relay, which switches the solenoid valve.
OpenSprinkler is designed for time-controlled switching of the solenoid valves. Without this, you couldn’t even create an “irrigation plan”.
KeymasterHello,
You can use a sensor input to start a program - it would then run time-controlled.
Simply set it to type “Program” in the settings/sensors. The first sensor starts the first program.
LG Stefan
KeymasterSimply define relay 1 as the main irrigation circuit and enter the time.
Menu at the bottom right, “Edit options”, “Configure main irrigation circuit”
KeymasterYou can control AC or DC 24VAC solenoid valves with OpenSprinkler. The DC version uses a circuit trick that increases the voltage when switched on (boost) and thereby activates the solenoid valves. Shortly afterwards the voltage drops back to the power supply voltage (7.5VDC - 12VDC).
As for performance, it depends on how many solenoid valves you want to operate AT THE SAME TIME.
In principle you can calculate it like this: The starting current of a solenoid valve determines the performance.
OpenSprinkler has a power consumption of approximately 2.2W = approx. 0.1A. A Rain-Bild solenoid valve has a maximum current of 0.3A
I.e. with 4 solenoid valves AT THE SAME TIME you have 4x 0.3A + 0.1A = 1.3 A inrush current, the next larger power supply with 2A should be used. We have various power supplies in the shop.
If you only operate one or two solenoid valves at the same time, you have 2×0.3A+0.1A = 0.7A, a 1A power supply is sufficient. Even if you have 20 solenoid valves but only activate 2 at the same time, that is enough.
Note: This is just an example calculation! Please note the technical data of the solenoid valve manufacturer!Regarding the distributor, take a look here:
https://dvs-beregnung.de/dvs-specials/plugrain-garten/hunter-wandverteiler
KeymasterBy the way, API documentation is available here:
https://openthings.freshdesk.com/support/solutions/articles/5000716363-os-api-documents
KeymasterHello, so with OpenSprinkler you can switch both WLAN and RFToy controlled devices.
Unfortunately I can't say much about the range, in your case it's only possible by trying it out.
KeymasterGPIOs are probably triggered by another application, do you have other programs running?
The GPIOs are described in the manual: https://OpenSprinklerShop.de/downloads –>OSPi 14+
KeymasterYes, it works. Only the 40 pin header has to be present, otherwise the board cannot be plugged in. So only with the W/WH model or solder on later.
So OSPi is tested with Raspi version:
Zero*
Zero W/WH
1 mod. A+
1 mod. B+
2 Mod. B
2 Mod. B v1.2
3 mod. A+
3 Mod. B
3 mod. B+
4 Mod. BNOT suitable are:
Zero*
1 Mod. A
1 Mod. B* = 40 pin header must be soldered on
KeymasterHello,
yes, that works and you're in luck, because now with OSPi version 1.5 there are two sensor inputs - 1.44 and its predecessor only had one.
You need a relay with suitable power, I don't know the power of the submersible pump, so check whether the following relay fits:
Finder 22.32.0.024.4540 Contactor 1 make contact, 1 break contact
Your float switch works like a rain sensor when it rains -> no watering. So if Sen1 and GND are connected, the submersible pump is not activated.
You can set for each circuit whether it should react to Sen1.
-
AuthorPosts